
What is Shopware Docker (and which image to use)
Shopware Docker means running Shopware 6 inside containers, using one of two images: Dockware for local development or the official shopware/docker-base image for production. Dockware ships a complete, preinstalled stack for fast local work. The official base image ships only PHP and FrankenPHP, so you build your code on top for a hardened live deployment.
The two images solve different problems. Dockware, maintained by the German agency dasistweb, is built for developers who want Shopware running in minutes with Adminer, Mailpit, and Xdebug already wired up. The official image, published at github.com/shopware/docker, is a minimal production base. If you have used XAMPP or MAMP before, Docker replaces both, and it gives you the identical environment on every machine. For the wider platform context, see Shopware explained.
According to the official Shopware Docker documentation, the base image "is based on the official PHP image and includes the required PHP extensions and configurations to run Shopware 6, but it does not contain Shopware itself." That one sentence explains the whole workflow. The official image is a foundation, not a finished shop. It is the opposite of Dockware, which hands you a running store on the first `docker run`.
Dockware vs official image
Use Dockware for local development and the official image for production. Dockware bundles a full stack with Shopware preinstalled, demo data, and developer tools, so you start coding in seconds. The official shopware/docker-base image is minimal and locked down, ships without Shopware, and expects you to build your own image on top before it ever sees live traffic.
| Feature | Dockware (recommended for dev) | Official Shopware image (recommended for prod) |
|---|---|---|
| Focus | Maximum developer speed, ready in seconds | Maximum security and performance under load |
| Setup speed | Instant, Shopware 6.6 preinstalled | Slower, you run a build step first |
| Root access | Yes, sudo and full control | No, runs as a non-root user |
| Included tools | Adminer, Mailpit, Xdebug, PimpMyLog | None, clean base image |
| Shopware included | Yes | No, you copy your own code in |
| Use case | Local development, plugin work, debugging | Production deployment, live traffic |
Dockware's dev image lets you, in its own words, "run and explore any Shopware 6 version within minutes locally in Docker." The official base image gives you nothing but PHP 8.2 or newer and FrankenPHP until you add your code. Where Dockware optimises for a fast inner loop, the official image optimises for a small, auditable production artifact. Pick the tool that matches the phase you are in.
Prerequisites for Shopware 6.6+
Before you pull an image, prepare the host. As of 2026, Shopware 6.6 requires PHP 8.2, Node.js 20, and MySQL 8 or MariaDB 10.11, with a PHP memory limit of at least 512 MB. Dockware sets all of this up for you automatically. For a production build you pin the versions yourself in the Dockerfile, so it pays to know the exact numbers.
The Shopware system requirements list PHP 8.2 as the floor for Shopware 6.6, with 8.3 recommended, and Node.js 20 for building the Storefront and Administration. Shopware 6.7, released in May 2025, added PHP 8.4 support, and PHP 8.5 works from version 6.7.7 (February 2026) per the Shopware release notes. For the full checklist, see our guide to Shopware server requirements.
Hardware and OS
- RAM: 8 GB minimum, 16 GB preferred. Docker is hungry, and OrbStack still uses far less than Docker Desktop.
- Storage: an SSD is mandatory. Plan at least 10 GB for images and volumes.
- CPU: a multi-core processor keeps parallel build steps fast.
Software stack
- Git for version control and cloning repositories.
- Docker Engine, installed per platform.
- Windows: Docker Desktop with the WSL2 backend. This is not optional.
- macOS: OrbStack, strongly preferred over Docker Desktop. See the performance section below.
- Linux: a native Docker Engine install, no VM needed.
Local setup with docker-compose
To run Shopware locally, create a docker-compose.yml based on dockware/dev, map port 80 for the web server and 3306 for the database, then run `docker compose up -d` and open localhost. Within about a minute you have a working shop with Adminer, Mailpit, and Xdebug ready for plugin development and installation testing.
Quick start: throwaway shop
Want to look at Shopware for five minutes? This starts a temporary container that deletes itself on stop (`--rm`). Nothing persists. Perfect for a demo, useless for real work.
```bash # Start a throwaway Shopware 6.6 shop with PHP 8.3 docker run --rm -p 80:80 dockware/play:latest ```
Professional setup: docker-compose
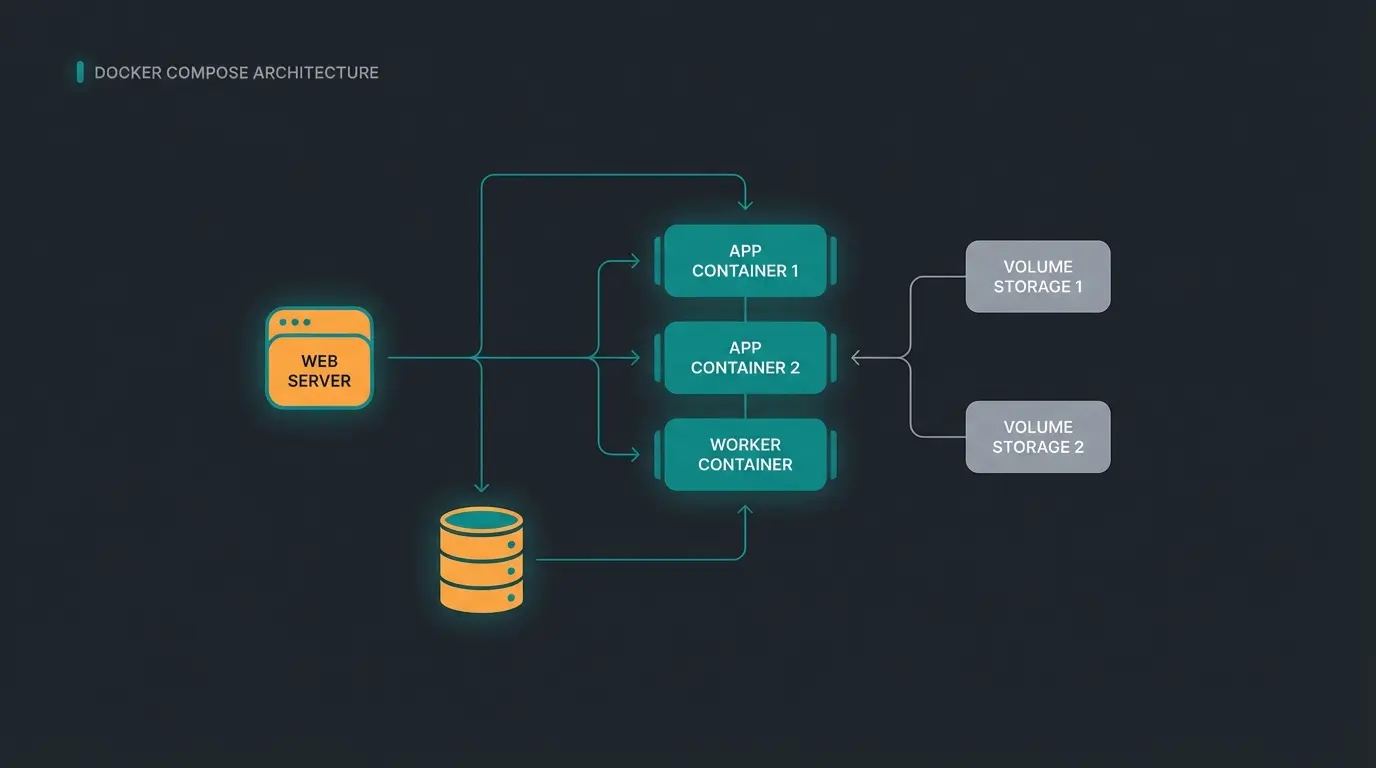
For real development you need persistence. Create a folder `my-shop`, and inside it a `docker-compose.yml`. This file is the blueprint of your local infrastructure, and it is the same file you extend later when you add a second service.
```yaml services: shopware: image: dockware/dev:latest # full local stack, Shopware 6.6 preinstalled container_name: shopware_local ports: - "80:80" # Storefront and Administration - "3306:3306" # MySQL access from your host - "22:22" # SSH - "8888:8888" # Adminer (database GUI) - "8025:8025" # Mailpit (captured emails) volumes: - "./src:/var/www/html" # live-edit your code from the host - "db_volume:/var/lib/mysql" # persist the database environment: - PHP_VERSION=8.3 - XDEBUG_ENABLED=1 networks: - web volumes: db_volume: networks: web: external: false ```
Start it from inside the folder:
```bash docker compose up -d ```
- Image: `dockware/dev` already contains Caddy, PHP, MySQL, and Node.js, so there is nothing else to install for Shopware development.
- Ports: port 80 serves the shop, and the extra ports expose the database GUI and mail catcher you need while debugging.
- Volumes: the host folder `./src` syncs into the container, so you edit files in your IDE and the change is live immediately.
Advanced configuration: database, mail, and extra services
Dockware exposes the tools you need for real debugging: Adminer for the database at localhost:8888, Mailpit for captured email at localhost:8025, and an internal Docker network for connecting extra services. Inside that network, containers reach each other by service name, not by localhost. That detail matters the moment you add a second container.
Database access with Adminer
- Open `http://localhost:8888`.
- Server: `localhost` or `db`, depending on internal routing.
- User: `root`, Password: `root` (the Dockware default).
Email testing with Mailpit
During testing, order confirmations must never reach real customers. Dockware catches every outgoing email automatically, and you read them at `http://localhost:8025`. That includes any transactional mail your own extensions send.
Connecting an extra service
If you add a separate container, for example a KI-Mitarbeiter that reads product data through the Shopware API to answer buyer questions in real time, put both containers in the same network. Then the service reaches the shop by name:
```yaml ai-service: image: my-product-consultant:latest environment: - SHOPWARE_API_URL=http://shopware:80 # reach the shop by service name networks: - web ```
Production configuration and hardening
For production, do not ship Dockware. Base your image on ghcr.io/shopware/docker-base, enable OPcache and JIT, run the container as a non-root user, add a healthcheck, and pass secrets as environment variables instead of baking them into the image. Then build your code into the image once and deploy that immutable artifact to every server.
The hardening steps below turn the base image into a production artifact. Work through them once, then bake them into your performance optimization and backup routine so every deploy is consistent.
- Base on the official image. Start your Dockerfile from `ghcr.io/shopware/docker-base` at a pinned PHP version.
- Enable OPcache and JIT. Both cut PHP execution time under load and are off by default in some setups.
- Run as a non-root user. Drop to `www-data` so a compromised process cannot own the container.
- Add a healthcheck. Let the orchestrator restart the container when the shop stops responding.
- Inject secrets via environment variables. Database passwords and API keys never belong in the image layers.
- Build once, deploy the same artifact. The image you tested is the image you ship, byte for byte.
```dockerfile # syntax=docker/dockerfile:1 FROM ghcr.io/shopware/docker-base:8.3-frankenphp # Copy your built Shopware project into the image COPY --chown=www-data:www-data . /var/www/html # Enable OPcache and JIT for production performance ENV PHP_OPCACHE_ENABLE=1 \ PHP_OPCACHE_ENABLE_JIT=1 # Drop root privileges USER www-data # Restart the container if the shop stops responding HEALTHCHECK --interval=30s --timeout=5s --retries=3 \ CMD curl -fsS http://localhost || exit 1 ```
The contrast with local development is the whole point. Dockware runs everything as root with tools wide open, while the official image assumes an adversarial internet and closes those doors by default. Build the artifact in your CI pipeline, push it to your registry, and deploy it to a server or a Kubernetes cluster.
Performance optimization on macOS, Windows, and Linux
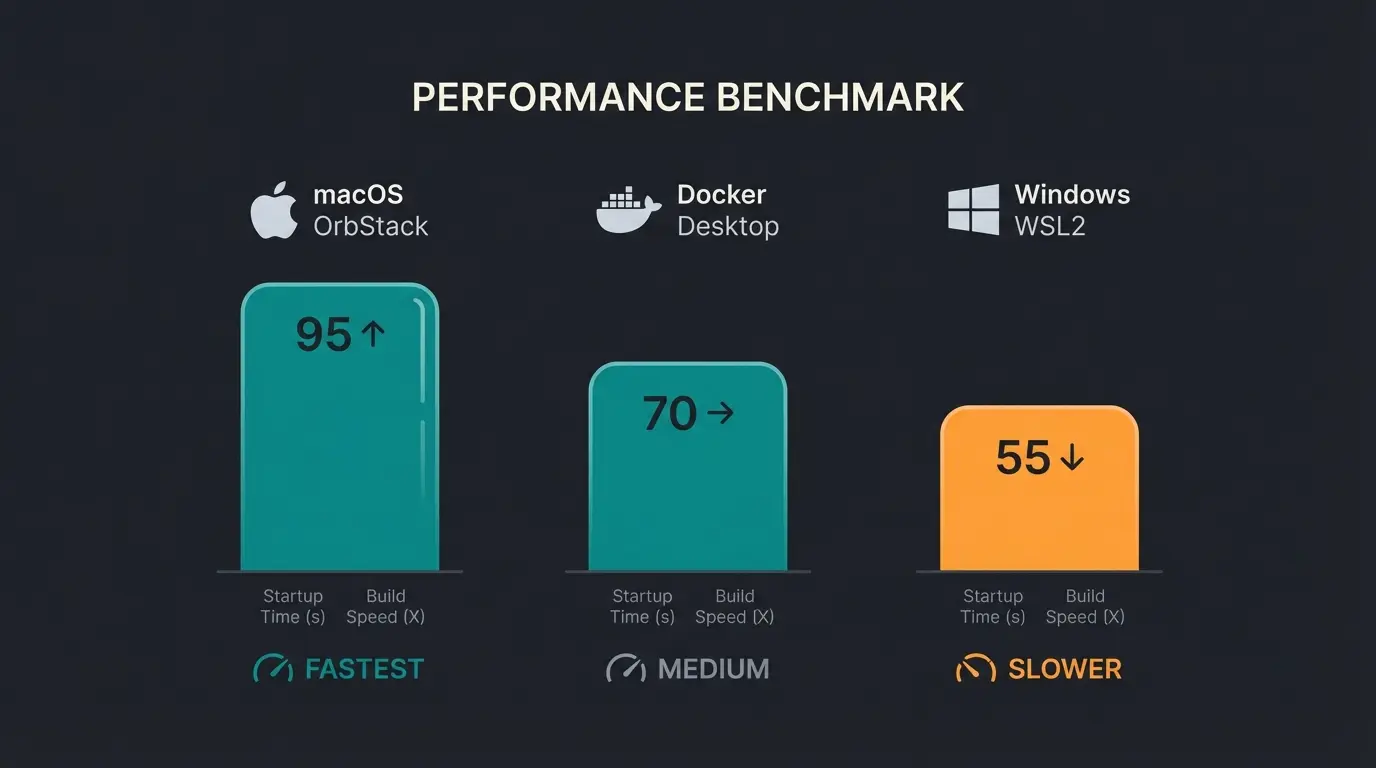
Docker performance on macOS and Windows depends almost entirely on the filesystem. On macOS, OrbStack runs at 75-95% of native filesystem speed, compared with roughly 25-40% for Docker Desktop. On Windows, run everything inside WSL2 and keep your project out of the NTFS mount. On Linux, Docker runs natively and needs no workaround at all.
macOS: use OrbStack
Docker on macOS was slow for years because of filesystem mounting. OrbStack fixes this. According to OrbStack's own filesystem benchmarks, it reduces per-call overhead by up to 10x versus standard VirtioFS, which lands real-world file operations at 75-95% of native speed. Install it with `brew install orbstack`, change nothing in your compose file, and it just works as a drop-in for Docker Desktop.
Windows: WSL2 is mandatory
On Windows, never run Docker against the NTFS filesystem. It is painfully slow.
- Install WSL2.
- Clone your project inside the Linux filesystem, for example `\\wsl$\Ubuntu\home\user\project`.
- Run Docker Desktop in WSL2 mode.
Done correctly, this gives you near-native Linux performance on a Windows machine. The gap between a project on NTFS and the same project inside WSL2 is not subtle, it is the difference between a usable shop and an unusable one.
OrbStack vs standard VirtioFS on file operations
Typical improvement on volume-mounted workloads
Troubleshooting common Docker errors
Most Shopware Docker problems come down to three causes: a port already in use, a database that has not finished booting, or a slow filesystem mount. Port 80 conflicts are fixed by remapping to 8000:80. A refused MySQL connection usually means waiting 10 to 20 seconds. Slowness on macOS or Windows always points back to the filesystem.
Port already in use
Problem: "Port 80 is already in use." Cause: another service (Apache, a second container) holds the web port. Fix: change the mapping in `docker-compose.yml` to `8000:80`, then open `http://localhost:8000`.
MySQL connection refused
Problem: "MySQL connection refused." Cause: the shop container started before the database finished initialising. Fix: wait 10 to 20 seconds, then check the logs with `docker logs shopware_local`.
Everything is slow
- On a Mac? Switch to OrbStack. This is almost always the cause.
- On Windows? Confirm the project lives inside the WSL2 filesystem, not on `C:`.
- Xdebug on? It slows PHP heavily. Set `XDEBUG_ENABLED=0` when you are not actively debugging.
Docker vs managed and cloud hosting
Choose Docker self-hosting when you want full control, portability, and a local environment that matches production exactly. Choose managed or cloud hosting when you would rather let a provider handle updates, scaling, and backups. Most SMEs run Docker locally for development and a managed platform for production, which pairs a fast dev loop with hands-off operations.
| Dimension | Docker self-hosted | Managed / cloud hosting |
|---|---|---|
| Control | Full: your image, your server | Limited: provider sets the stack |
| Updates and patching | You own them | Handled for you |
| Scaling and backups | You configure and run them | Included in the plan |
| Best for | Teams with DevOps capacity | SMEs who want to focus on selling |
If you want the container control without running the servers yourself, Shopware managed hosting and Shopware cloud hosting both take the operations load off your team. For a side-by-side of providers, our guide to the best Shopware hosting breaks down the options that actually fit an SME budget.
Frequently asked questions
Create a file named `docker-compose.yml`, define a service using the `dockware/dev:latest` image, and map port 80 for the shop plus 3306 for the database. Add a volume for `/var/www/html` so your code persists, then run `docker compose up -d`. A working local shop is ready in about a minute.
For local development, pull Dockware from Docker Hub with `docker pull dockware/dev:latest`. For production, use the official base image at `ghcr.io/shopware/docker-base`, documented in the Shopware Docker guide. The official image ships PHP and FrankenPHP but not Shopware, so you copy your own code in.
Almost always the filesystem. On macOS, switch from Docker Desktop to OrbStack for 75-95% native speed instead of 25-40%. On Windows, keep files inside WSL2, and disable Xdebug with `XDEBUG_ENABLED=0` when you are not debugging.
Yes, with different port mappings. Run Shopware 6 on `80:80` and Shopware 5 on `8080:80` in separate containers. Docker isolates each stack, so the two versions never collide on ports or databases.
No. Dockware runs as root with open tools such as Adminer without a password, which is fine locally but a serious risk online. For production, build on `ghcr.io/shopware/docker-base`, which runs as a non-root user and is hardened for live traffic.
Dockware `play` is a ready-to-run image with Shopware preinstalled, ideal for a quick look. Dockware `dev` adds developer tools like Xdebug, Adminer, and Mailpit for real work. Dockware `essentials` is a minimal base for building your own custom configuration.
Which setup should you run
Two decisions cover almost every case. For local development: run Dockware, add OrbStack on macOS or WSL2 on Windows, and you have a Shopware 6.6 shop in minutes. For production: build on `ghcr.io/shopware/docker-base`, harden it as shown above, and deploy an immutable artifact.
The container itself is only infrastructure. What you build on top is where the return sits. When you are ready to move from a local shop to a live one, our guide to the best Shopware hosting covers the hosting options that matter.
Your Docker setup is production-ready. A KI-Mitarbeiter turns that traffic into revenue: it advises customers in real time over the Shopware API, and our clients see up to 35% higher cart value and a 7x higher conversion rate.
See the AI product consultant
Kevin is CTO and co-founder of Qualimero. As an AI architect with over 15 years of experience as CTO and CPO in the tech industry, he designs the AI systems that automate tens of thousands of customer interactions daily for Qualimero's clients — reliably, securely, and at scale.